
Lead Management
Leads Overview
Leads are your business opportunities. They are the contact information of people or organizations that have expressed an interest in your company’s product offering. Your organization can then use further marketing and promotional tools to convert those potential customers into paying customers.
bstarCRM allows your team to properly keep track of all information and conversations, whilst nurturing the lead into a customer.

Using the main actions panel (as shown above) you are able to do the following:
- (1) (2) Create a new lead.
- (4) Filter leads.
- (5) Sort leads (e.g. sort by due date).
- (6) Toggle between list view and kanban board view.
- (7) The admin user can select to either view only the leads that they are assigned to or to view all leads.
- (8) The free text search box, allows you to quickly find specific leads.
kanban View
The dashboard allows you to view leads as a list or as cards on a kanban board. You can easily change between these two viewing modes at any time. The dashboard also remembers your viewing preferences, so you do not need to keep changing every time.

The kanban view has the following features:
- (1) Kanban board
- The kanban board is a workspace that denotes a lead’s progress. As you make progress on a lead, you can drag it from one board to another.
- (2) Lead cards
- Each lead is represented by a card. The face of this card has some basic/summary information about the lead. To work on the lead, simply click the card and you will get a full view of the lead.
- (3) Add new lead button
- (4) Quick editing button.
- (5) You can change the position of a lead by simply dragging it up or down.
- (6) As work progresses on the lead, you can move it from one board to the next, by simply dragging and dropping it.
List View
You can also view leads in a simple table format, as shown below.

From the table list view, you are able to do the following:
- (1) Create a new lead.
- (2) Open a lead.
- (3) Delete a lead.
- (4) Edit a lead.
Most of the actions on a lead can only be carried out by users assigned to the lead.
Working On A Lead
When you open a lead, you are presented with a view as shown below:
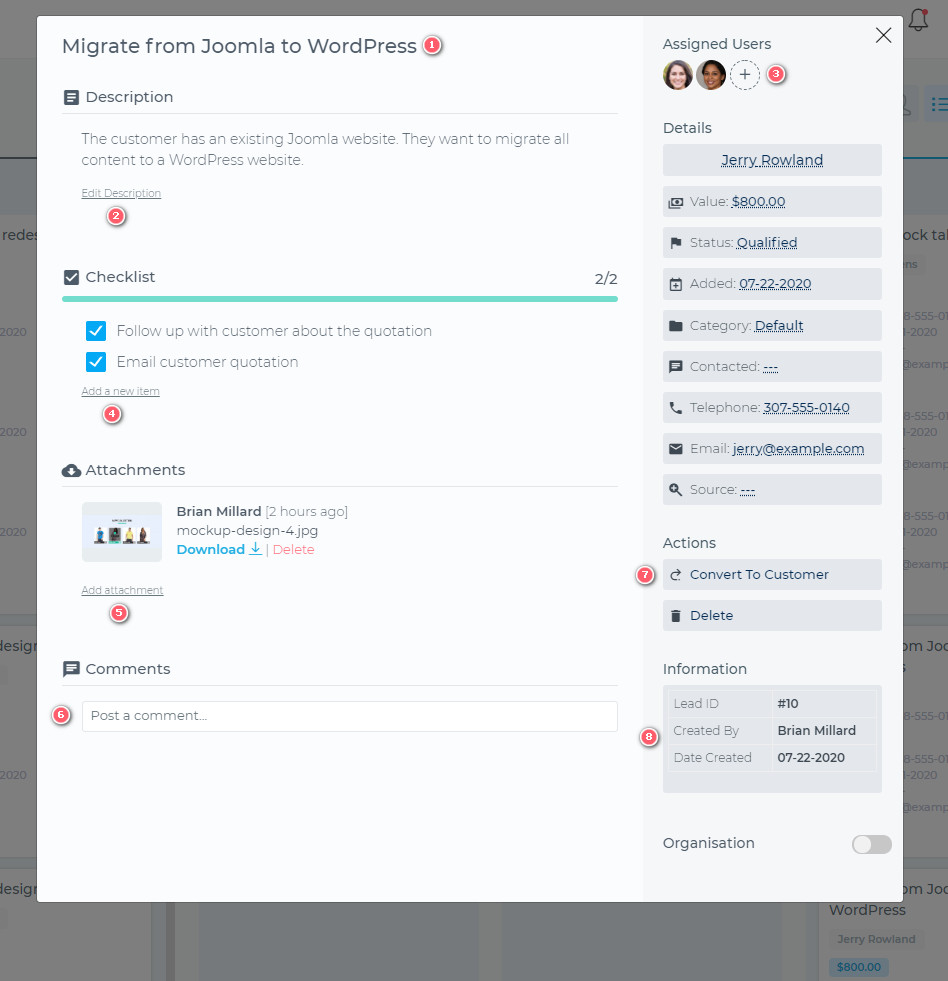
bstarCRM makes working on your leads very easy and intuitive. You are presented with a clean, user-friendly working space, where you are able to do the following:
- (1) Edit the lead title.
- (2) Edit the lead description.
- (3) Assign different team members to the lead.
- (4) Create and complete checklists.
- (5) Attach files to the lead.
- (6) Comment and collaborate with team members.
- (7) Convert a lead to a customer
- (8) A summary view of key lead details/attributes
Custom Fields
Custom fields allow you to extend the data that you can collect about your leads. This data will be in addition to the standard form fields that are available when you add/create a new lead.
#To get started, go to:
App > Setttings > Leads > Custom Fields
#You will be able to create different types of form fields
- Simple Text
- Paragraph (Long Text)
- Number
- Drop Down List
- Check Box
- Decimal
- Date
You will also be able to tweak some settings about your form field, such as
- Use in the standard form – This means the field will be displayed in the “Add New Lead” form
- Show on project profile – This means the data will be displayed on the lead details page
- Show in filter panel – This will make the field available when you are searching and filtering your leads

Form Options
You can further tweak how the form fields will be displayed in the “Add New Lead” form. To do this, click on the Standard Form menu item (as shown below)
#You will be able to do the following:
- Reorder the form fields (drag & drop)
- Specify if the form field is mandatory (required)

Leads Settings
From the leads settings page, you will be able to apply settings for how the application will handle leads. Below are the available settings.
General Settings
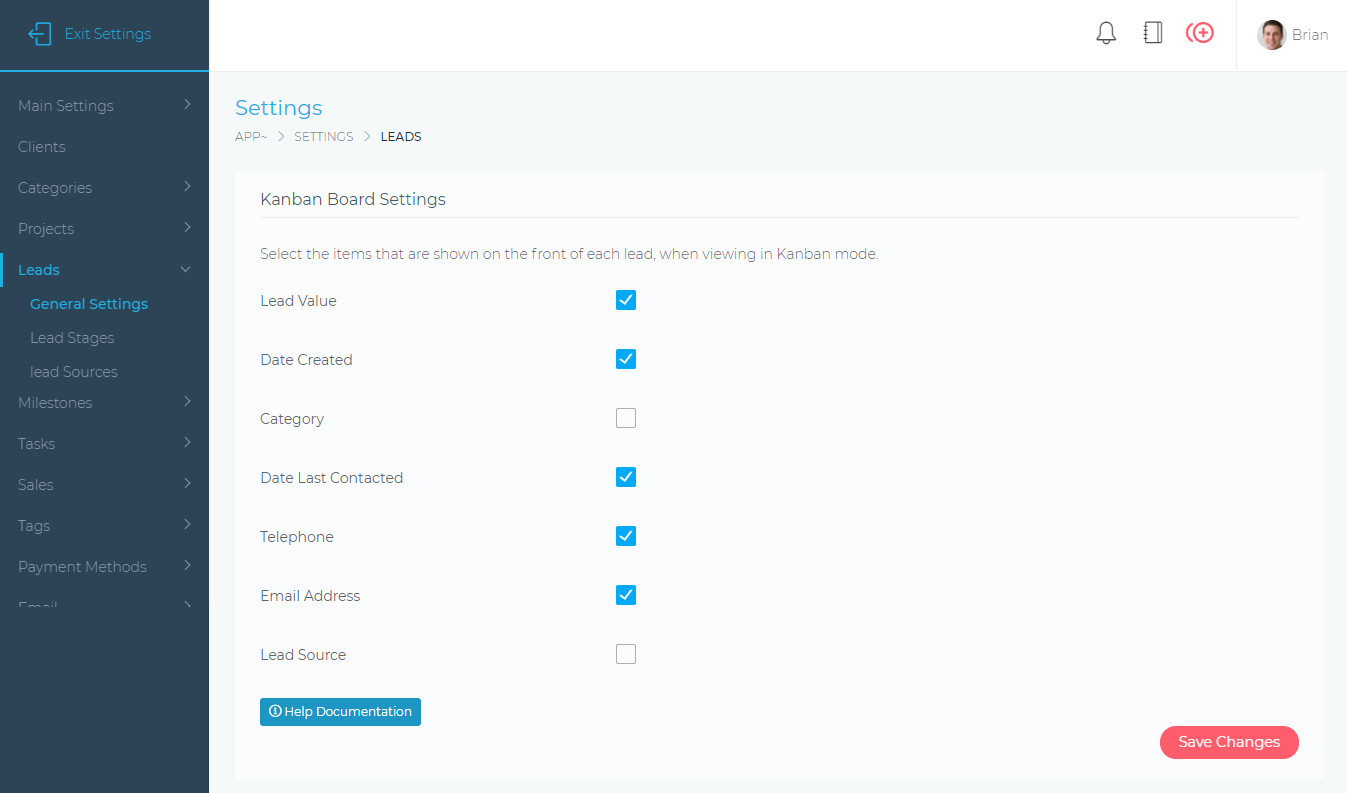
Here you can specify what information will be displayed on each lead when being viewed in kanban mode. Example as illustrated in the image below
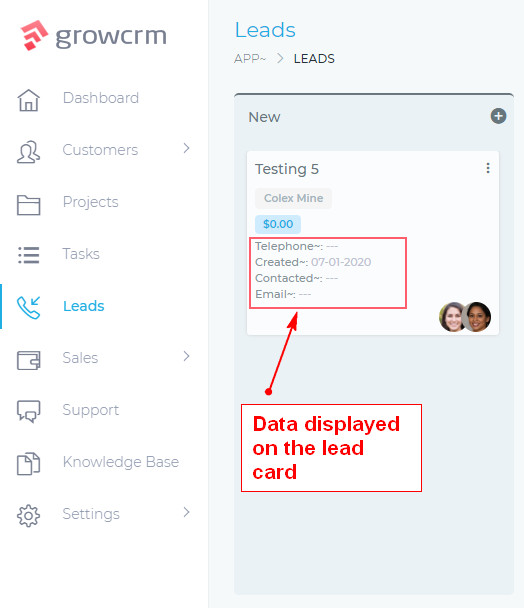
The data shown on the image above can be changed using the settings shown below.
From this screen, you will be able to do the following:
- Add new lead sources.
- Edit existing lead sources
- Delete lead sources
Note: When you delete or edit lead sources on this page, the changes will not affect leads that have already been created.
Lead Stages
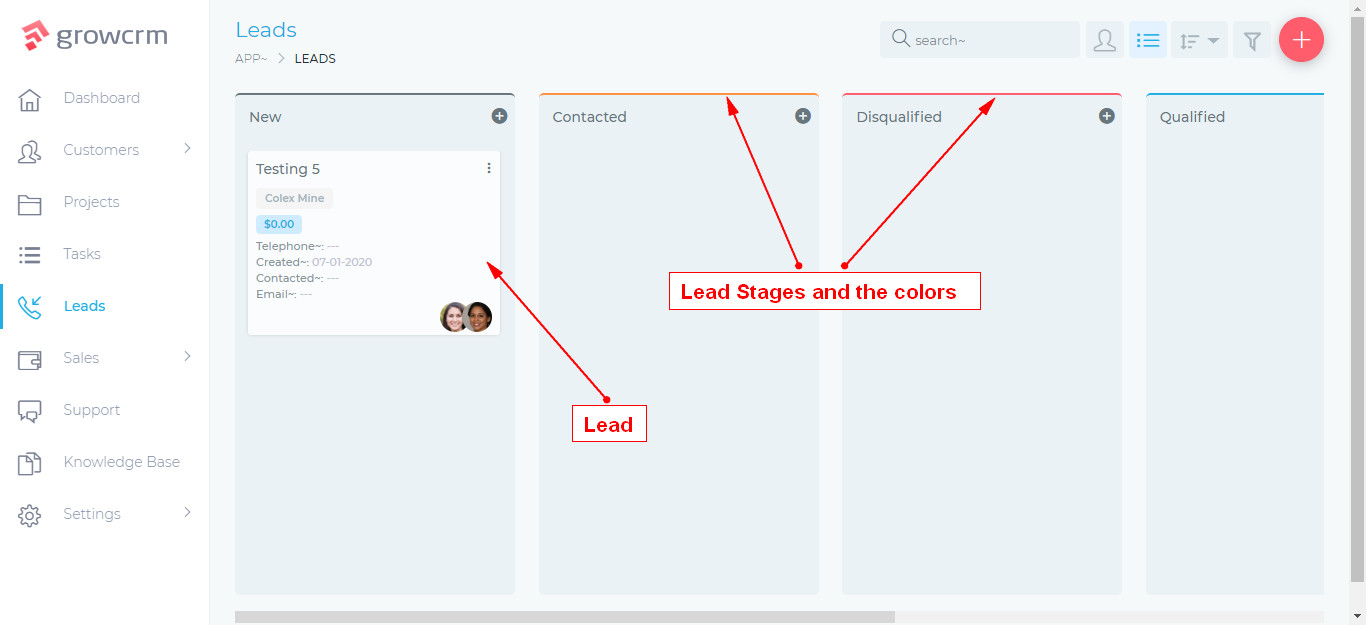
Lead stages are the various stages that a lead moves through. When you get a new lead, it will be placed in the New stage. As you make progress with the lead, you can move it to Qualified -> Contacted – – – – > Converted.
The system requires a minimum of 2 staged New & Converted. You can create as many other stages as you like, between these two start and final stages.
The image below shows how the stages are used when working with your leads.
The image below shows the Lead Stages settings
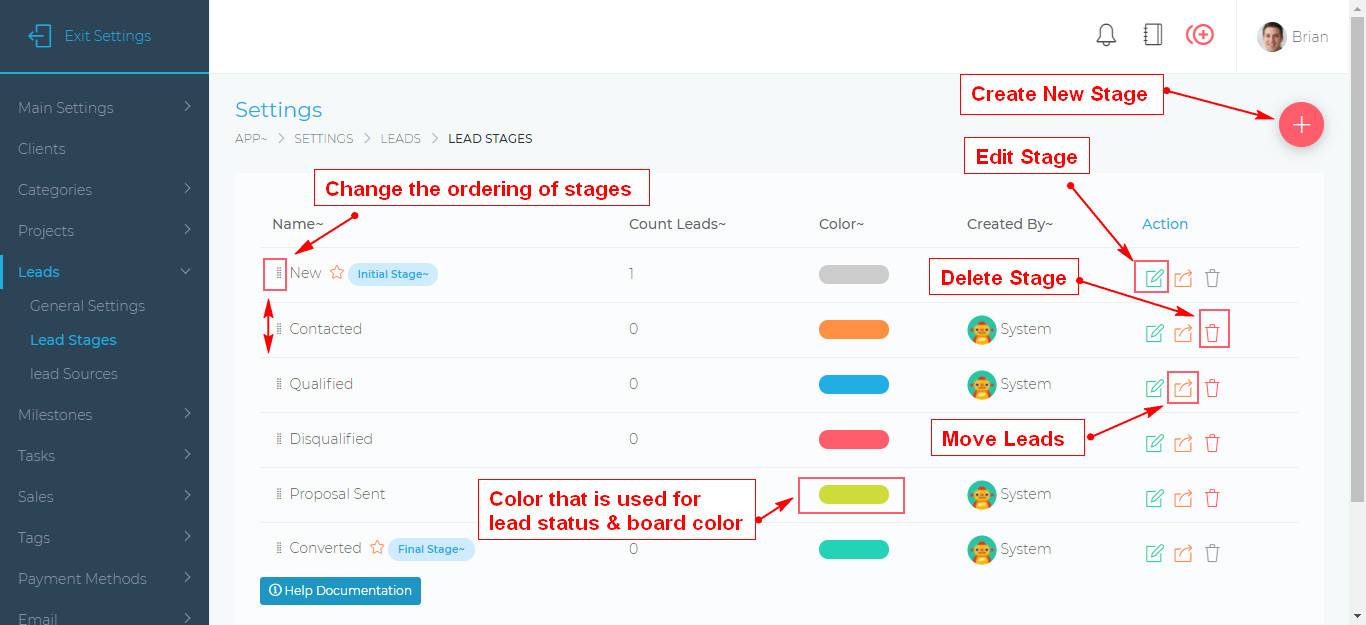
From the screen above, you will be able to carry out the following action:
- Add and delete lead staged (Note: You can not delete the default stages, marked with the star icon)
- Change the lead stage color
- Edit the lead (change its name)
- Bulk move leads from one stage to another)
- Change the ordering of the lead staged (using drag & drop)
Lead Sources
From this screen, you will be able to specify lead sources (e.g. Google, Yellow Pages, etc). Users will be able to select these sources via a dropdown list when creating new leads.
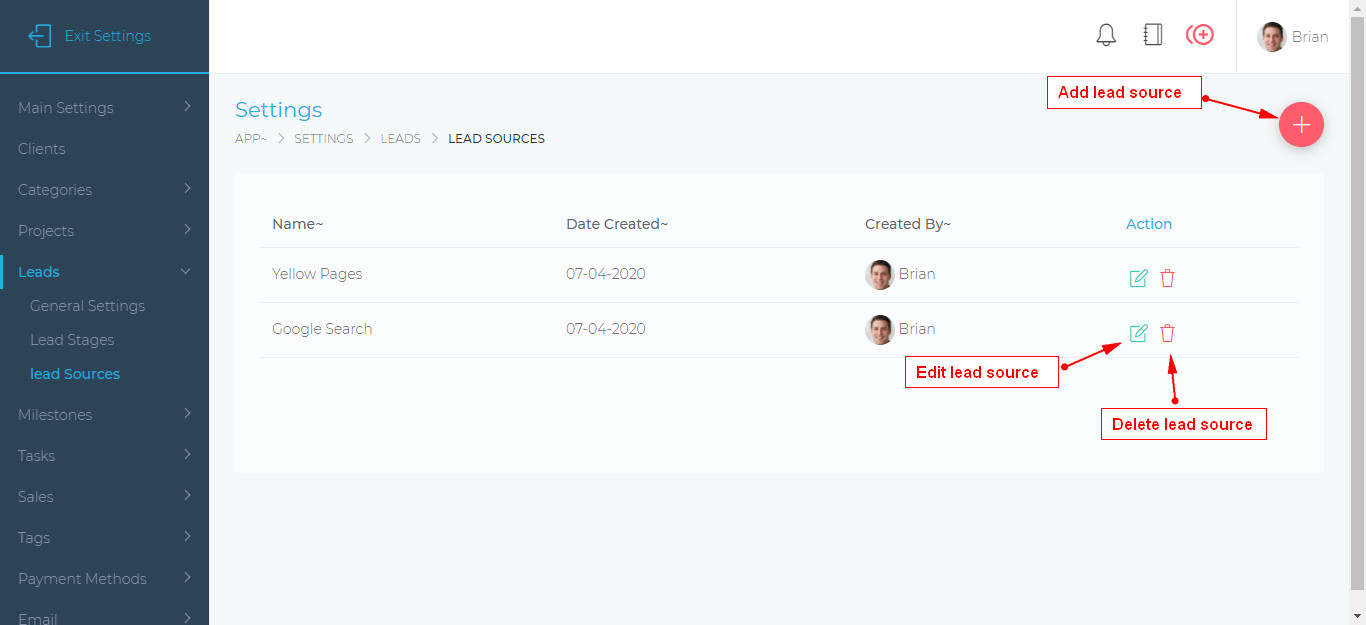
From this screen, you will be able to do the following:
- Add new lead sources.
- Edit existing lead sources
- Delete lead sources
Note: When you delete or edit lead sources on this page, the changes will not affect leads that have already been created.
Lead Web Forms
The lead web forms feature allows you to create forms for capturing new leads. The feature comes with an easy-to-use form builder.
Once you have finished creating your form, you will be able to embed the form in your existing website.
Each form will also have a direct link which you use, without needing to embed it.
Create Your Form
The first thing you will need to do is to create your web form.

Use the form builder to create your leads form (as shown below)

Get The Embed Code
Once you have created your form, you can now copy the embed code. This is the code that you can add to any page on your main website.
You can use the embed code (1) but you can also use the direct link (2).
When you prospective customers fill in this form, a new lead will automatically be created inside the CRM.